The electric seat assembly has two metal
rods running from left to right. One rod is in the front of the seat (the one that breaks), the other rod is at the
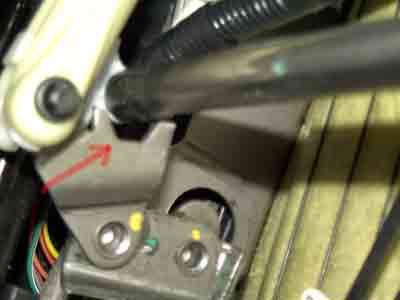
back of the seat. Each rod goes through the center of two metal brackets that resemble washers with a hex shaped center
space (for the metal rod). These "washers" are attached to the adjustment motors and are used to adjust the seat up
and down. These washers are the parts that eventually wear out and break (one of the broken "Washers" is indicated with the
red arrow in the image below).
- Remove the seat by unbolting 4 bolts from the floor.
- Disconnect the two wiring connectors that power the seat
- Unbolt the seat belt attachment from the seat.
- Beware, 2002-2003 models that use side-curtain
airbags may need additional steps to avoid deploying the airbag. Pre side-curtain airbag D's don't appear to have any
airbag related connector. (I received an update from a
friend who tells me that on the 2002-2003 there is no airbag wiring to the seat with side curtain airbags.)
- Turn the seat over and secure the seat for removal of
the electric motor/bracket assembly.
- Remove the 6 torx screws (4 in back, 2 in front) that
attach the bracket assembly to the seat. I believe we used a T45 socket. The bracket assembly gets in the way of
the torx bolts, so we used a battery from a cordless drill and ran wires to the electric motor to move the bracket around
and clear the torx bolts.
- The motors are connected to the brackets using screw
drives that go through two large plastic connectors. These plastic connectors are bolted to the bracket assembly.
They are very close to the welding points and they must be removed to eliminate problems during the welding process.
I'm not sure what this type of specialy bolt is called, but the closest description I can think of, is that it is a
"Reverse Torx". The head of the bolt looks like the male version of a torx bolt. Remove these two bolts and
swing the arms away from the weld points.
- Locate the 4 washers mentioned previously, and have
the welder fortify the washers by welding them to the metal rods. I could have done just the front rod/washers; but I
figured welding all bolts would eliminate future problems at the other washer locations.
They charged me $40 for all 4 bolts. This is cheap when you compare it to
the $400 - $500 for a new motor/bracket assembly.
I apologize for the lack of photos, but once you take the seat out you should
be able to easily identify the location of the washers.
Please feel free to email me directly if you have additional questions -- Bill Thornton
|