STEP 1 -- Remove The Factory Mirror And Install The Gentex Mirror.
| a) |
There is a Torx T-20 bolt holding the original mirror to the windsheild button. Loosen the bolt and lift the mirror straight up to remove it.
Wrap it up in the packaging that your Gentex mirror and save it for reinstallation when you sell the Durango!
|
| b) |
Plug the factory harness into the rear of the Gentex mirror and slide it down onto the original factory winshield button. There is a Torx T-20 bolt in the Gentex mirror, so tighten it to hold the mirror to the factory windshield button. |
|
STEP 2 -- Route The Mirror Wiring Harness
| a) |
You do not need to remove the headliner to install the mirror. There should be a "Notch" in the headliner directly above the mirror location. This is for wiring the optional electrical mirror so you can use it for this mirror. Pull the headliner
down slightly and put wiring harness for the Gentex mirror through the notch and just tuck it in behind the headliner. Route the wiring harness along the headliner by slightly pulling down the headliner and just pushing the wirng harness behind it. Stop when you get to the A-Pillar.
harness for the Gentex mirror up
|
| b) |
Remove the trim over the A-Pllar. It is held onto the A-pillar by snap-in clips so if you just pull on it, it will pop loose. There is also a clip on the kick panel that holds it to the A-pillar trim. Pull the A-pillar trim off and lay it aside for now.
You will not need to remove the kick panel.
|
| c) |
Route the wiring harness down the A-pillar and tape it down in a couple of places to hold it. Pull the harness under the parking brake release, and just let it hang over the top of the kick panel for now. Replace the A-pillar trim panel by aligning the clips in the
holes and just snapping them back into place. Make sure not to cut or crimp any of the wires in the harness when you replace the trim panel.
|
|
STEP 3 -- Connect The Temperature Probe
| a) |
The temperature probe needs to be mounted at the front of the vehicle, in front of or beside the radiator, and
at least 8" above the ground. It has a clip on it and I clipped it to the left side of the lower grille. Route the wire (it is in split tube) back
toward the firewall. Make sure not to let it lay against anything that wil move or will get very hot and melt the tube. I just came along the top of
the fender well, and headed it toward the grommet in the firewall that the throttle cable goes through.
|
| b) |
The temperature probe has a connector on it that mates to a connector on the wiring harness. Somehow you have to
get that through the firewall. There are a couple of existing grommets that can be utilized (one for the throttle cable, one for the hood latch release) however
they are not large enough to let the connector get through. The way I did it was to cut the connector off, pull it through the grommet, and then resolder the wires
together. If you aren't comfortable with this method you'll have to find a way to get it through somehow. If you do choose to use this method then cut the wires
at different places so that one is longer than the other. That way you will be able to reconnect them properly. I don't think it really matters whether they are
mixed up or not (thermocouples are usually just resistors that change resistance based on temperature and are not polarity sensitive, however I am not certain about this
application).
|
| c) |
Once you have the connector through the firewall, connect the connectors together and tape them up well to prevent moisture
from getting in and corroding the connections. |
|
STEP 4 -- Other Connections
| a) |
The mirror model I purchased only has three other connections to
be made; ground, switched 12 volts, and a reverse sensing connection. Two of those connections can be made from the fuse
block behind the side of the dash inside the driver's door. The connections for the factory auto-dimming mirror are
available there. The image below shows the fuse block FROM THE BACK as it would be viewed from beneath the
dash, looking out the driver's side.
VERY, VERY IMPORTANT!!! This image and the connections shown are for a 2000 Durango! Other models can,
and probably will be different! If you do not have a 2000 Durango then you should assume that these connections are
WRONG until you can verify them!
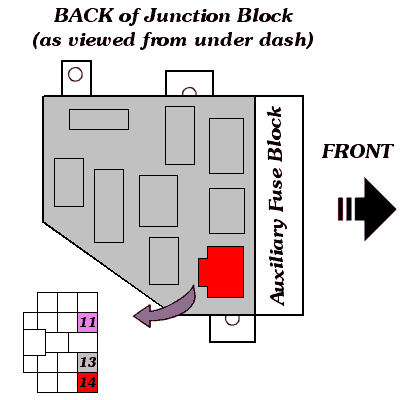
The +12v and Ground connections can be made at connector C3, the one that is shaded red in the image above. For orientation,
Pin 12 (between pin 11 and pin 13) has a tan 12 gauge wire connected to it. It is VERY important that you wire to the
correct connector and the correct wires. If you do not you could easily cause damage to your mirror! The correct
connector is right above the bracket that mounts the fuse block to the dash frame. If the connector on your Durango
does not have the wires as indicated below verify that you are looking at the correct connector. The connections shown
are from the 2000 Factory Service Manual.
|
| b) |
Pin 11 (shaded in violet) -- Backup Lamp Feed (Optional) -- This wire connects to the
white wire of the Mito mirror. It is a violet wire with a black tracer. You can use a "Quick Splice" to tap the wire.
This wire is in a difficult place to get to, so you may choose not to connect it at all. If you cannot get your hand up
there to tap it, you can also get to it behind the driver's side kick panel. Remove the scuff plate along the bottom
edge of the driver's door opening (it is just clipped in so you just need to pull it up), remove two screws holding the
kick panel on (one in the track that is revealed when the scuff plate is removed and another under the dash at the firewall),
then unsnap the kick panel from the A-pillar trim. There is a large bundle of wires behind the kick panel wrapped with
fabric tape. CAREFULLY remove enough of the tape to allow you to find the violet and black wire. Tap the wire, tape
the wire bundle back up, replace the kick panel and scuff plate.
If you choose not to connect this wire it will not cause any problems with the operation of your mirror. All this
signal does is to "Undim" the mirror when the transmission is in reverse. Since the chances that you will be backing-up
while someone's lights are in your mirror are very slim, it is really not necessary. The only time I have found it to
be somewhat handy is when I am backing out of my dark basement into the sunlight.
|
| c) |
Pin 13 (shaded in gray) -- Ground -- This wire is connected to the black wire
of the mirror. There should already be a wire there (20 gauge black) so all you need to do is use a "Quick Splice" to
tap onto it. You can also connect the black mirror wire to a suitable ground point. There are several places in the
vicinity of the kick panel that can be used. I did cut the majority of the excess wire off just to eliminate having
it bundled up somewhere, but that is not required.
|
| d) |
Pin 14 -- Switched 12 volts -- This wire is connected to the red wire of the
mirror. There should not be a wire at this pin of the connector so you will have to obtain a suitable pin for the
connector and installed it. You can also use virtually any other switched 12v connection (the "Add-A-Circuit" piggy-back
fuses will work just fine for that). I cheated a bit here. Instead of adding a pin to the connector I went to my radio
wiring harness. Since I had replaced the radio and had a Metra wiring harness I knew which wire was switched 12 volts,
so I used it. Because of that I cannot provide any information about what type of pin is required for the connector.
|
|
STEP 5 -- Test The Installation
| a) |
Turn on the ignition and the mirror display should come on automatically. The compass will have "CAL" beside it since it has not yet
been calibrated. The temperature should read the ambient temperature where you are working. If nothing comes on check your connections and make sure they are correct.
|
| b) |
To check the auto-dimming feature, place a piece of black electrical tape over the photocell on the FRONT of the mirror. Turn on the ignition and
shine a flashlight on the photocell on the REAR of the mirror (the inside) and you should see it dimming. They look a lot dimmer at night than they do in your workshop. Also,
if you connected the white reverse-sensing wire, put the vehicle in reverse and the mirror should "Undim".
|
| c) |
Set your compass zone. The card that came with your mirror has a map of the USA that defines the calibration zones. Find the zone that you
are in, turn on the ignition so that the mirror is on, press and hold the [COMP] button for three seconds, and the word "Zone" will be displayed. Repeatedly press the [COMP] button until it
reads the proper zone number for your area.
|
| d) |
The instructions state that it may take up to an hour of use for the compass to calibrate, however I found it to be only a few minutes. You can
"Force" the compass to calibrate manually. Find a big parking lot somewhere, press and hold the [COMP] button for 6 seconds until "C" is displayed. Now drive in three complete circles
allowing 45 seconds for each circle (I don't know how critical that amount of time is since I didn't have to manually calibrate my compass). The instructions stop here, but presumably you would
then press [COMP] again, or maybe do nothing at all. My guess is that by the time you get to the big parking lot the "Cal" indicator will have gond off anyway and you won't need to manually
calibrate the compass.
|
|
